เราสีแดง, นักรบไซต์เบอร์, พวกเราชาวสีแดง, ความจริงวันนี้, เผด็จการซ่อนรูป, ต้านเผด็จการ,เผด็จการ
Would you like to react to this message? Create an account in a few clicks or log in to continue.


เราสีแดง, นักรบไซต์เบอร์, พวกเราชาวสีแดง, ความจริงวันนี้, เผด็จการซ่อนรูป, ต้านเผด็จการ,เผด็จการ,
 
บ้านบ้าน  Latest imagesLatest images  ค้นหาค้นหา  สมัครสมาชิก(Register)สมัครสมาชิก(Register)  เข้าสู่ระบบ(Log in)เข้าสู่ระบบ(Log in)  


 ลง Apache 2.2 + PHP + MySQL + FileZilla ด้วยตัวเอง (ตอน 2 / 4)

Go down 
ผู้ตั้งข้อความ
Admin
Admin


จำนวนข้อความ : 264
Join date : 08/05/2009

ลง Apache 2.2 + PHP + MySQL + FileZilla ด้วยตัวเอง (ตอน 2 / 4) Empty
ตั้งหัวข้อเรื่อง: ลง Apache 2.2 + PHP + MySQL + FileZilla ด้วยตัวเอง (ตอน 2 / 4)   ลง Apache 2.2 + PHP + MySQL + FileZilla ด้วยตัวเอง (ตอน 2 / 4) EmptySun May 10, 2009 9:35 am

ตอนที่ ๒
ติดตั้ง PHP

~~~~~~~~~~~~~~~~~~~~~~~~~~~~~~~~~~~~~~~~~~

เอาหล่ะครับ ต่อไป ก็ให้ไปที่ php.net ครับ แล้วกดที่ Downloads
(On the next step we'll install PHP. Go to php.net and click downloads)

ลง Apache 2.2 + PHP + MySQL + FileZilla ด้วยตัวเอง (ตอน 2 / 4) Image8

ไปที่ส่วนของ Windows Binaries ครับ แล้วกดตรงลิงค์ Installer เลยครับ
(Download the latest Windows Installer Binary)

ลง Apache 2.2 + PHP + MySQL + FileZilla ด้วยตัวเอง (ตอน 2 / 4) Image9

ลงไปตรงประเทศไทยแล้วเลือก Mirror ครับ (ผมเลือกอันที่ 2)
(Pick a mirror)

ลง Apache 2.2 + PHP + MySQL + FileZilla ด้วยตัวเอง (ตอน 2 / 4) Image10

รอโหลดไฟล์ให้เสร็จ แล้วเปิดโปรแกรม จะเห็นแบบนี้ครับ
(Download it and when it finishes open it. You will see:)

** ให้เก็บตัว Installer ไว้ เพราะว่า ถ้าต้องการเพิ่ม Extension ต่างๆ สามารถใช้ตัวนี้ำได้ **
(Don't delete the installer! You should keep it so it's easier to install more extensions)

ลง Apache 2.2 + PHP + MySQL + FileZilla ด้วยตัวเอง (ตอน 2 / 4) Image11

พอมาถึงตรงที่ให้เลือกที่อยู่ของไฟล์ ก็ให้สั้นๆ เหมือนกันครับ ผมเลือก c:\php
(Select the path, keep it short; I used: c:\php)

ลง Apache 2.2 + PHP + MySQL + FileZilla ด้วยตัวเอง (ตอน 2 / 4) Image12

เลือก Apache 2.2 Module ครับ เพราะเราลง Apache 2.2 ไำปแล้ว
(We've installed Apache 2.2 so we select Apache 2.2 module.)

ลง Apache 2.2 + PHP + MySQL + FileZilla ด้วยตัวเอง (ตอน 2 / 4) Image13

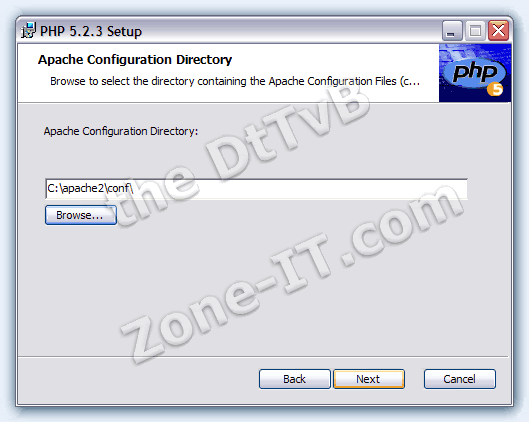
ต่อไปโปรแกรมจะให้เราเลือกที่อยู่ของไฟล์ Config ของ Apache ในที่นี้เป็น C:\apache2\conf
(Select the configuration file directory. In my case it's c:\apache2\conf)

ลง Apache 2.2 + PHP + MySQL + FileZilla ด้วยตัวเอง (ตอน 2 / 4) Image14

เลือก Extension ที่ต้องการลงครับ ที่สำคัญๆ ก็มี GD, MySQL, mcrypt, cURL, OpenSSL, ฯลฯ
(Select the extensions...)

ลง Apache 2.2 + PHP + MySQL + FileZilla ด้วยตัวเอง (ตอน 2 / 4) Image15

์Nextๆๆๆๆ Finish .... พอลงโปรแกรมเสร็จแล้ว Start -> Run -> services.msc แล้วไปที่ Apache2 กด Restart ครับ
(Finish the installation and when it's finished go to start menu, run, services.msc,)
(click at Apache2 and then click restart)

ลง Apache 2.2 + PHP + MySQL + FileZilla ด้วยตัวเอง (ตอน 2 / 4) Image16

ไปที่ C:\apache2\htdocs แล้วสร้างไฟล์ชื่อ test.php เขียนโค้ดลงไป
(Create a test file, called test.php and put it in htdocs dir)

<?php phpinfo(); ?>

ลง Apache 2.2 + PHP + MySQL + FileZilla ด้วยตัวเอง (ตอน 2 / 4) Image17

ลองเปิด http://localhost/test.php ถ้าใช้ได้จะเห็นแบบนี้ครับ
(Run the test program in your browser. You should see:)

ลง Apache 2.2 + PHP + MySQL + FileZilla ด้วยตัวเอง (ตอน 2 / 4) Image19

ตอนต่อไปเราจะลง MySQL กันครับ
(In the next episode we'll install MySQL)
ขึ้นไปข้างบน Go down
http://democraticthai.forumotion.com
 
ลง Apache 2.2 + PHP + MySQL + FileZilla ด้วยตัวเอง (ตอน 2 / 4)
ขึ้นไปข้างบน 
หน้า 1 จาก 1
 Similar topics
-
» ลง Apache 2.2 + PHP + MySQL + FileZilla ด้วยตัวเอง (ตอน 1 / 4)
» ลง Apache 2.2 + PHP + MySQL + FileZilla ด้วยตัวเอง (ตอน 3 / 4)
» ลง Apache 2.2 + PHP + MySQL + FileZilla ด้วยตัวเอง (ตอน 4 / 4)

Permissions in this forum:คุณไม่สามารถพิมพ์ตอบ
เราสีแดง, นักรบไซต์เบอร์, พวกเราชาวสีแดง, ความจริงวันนี้, เผด็จการซ่อนรูป, ต้านเผด็จการ,เผด็จการ :: Develop Zone! :: Webbuilder Zone-
ไปที่: